
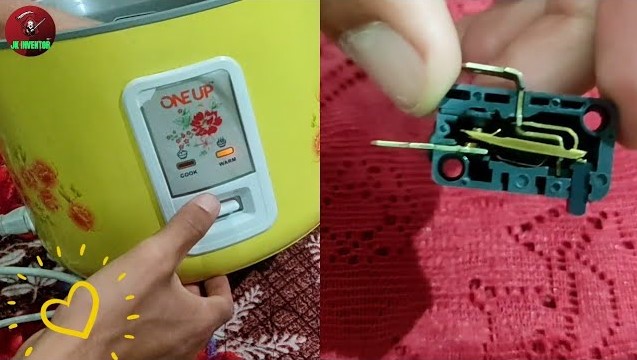
If your rice cooker switch not working, don’t panic! Most issues are caused by simple thermal fuse failures, dirty sensors, or loose wiring. This guide will help you safely troubleshoot and restore your appliance to perfect working order.
There is nothing quite as frustrating as coming home after a long day, ready to enjoy a warm bowl of rice, only to discover that your rice cooker switch not working. You press the lever down, but it refuses to stay locked in the “cook” position.
Or perhaps it stays down, but the unit never actually heats up. It is a kitchen nightmare that leaves many people reaching for their wallets to buy a brand-new appliance. But before you head to the store, take a breath. In many cases, this is a minor mechanical or electrical hiccup that you can fix in your own kitchen.
By 2026, we have seen a massive surge in sustainable living. Repairing your appliances is not just about saving money; it is about keeping electronic waste out of our landfills. Dealing with a rice cooker switch not working is often just a matter of cleaning a sensor or replacing a very cheap thermal fuse. Let’s walk through the steps to get your cooker back to making perfect, fluffy rice again.
Key Takeaways
- Safety First: Always unplug your rice cooker completely before attempting any internal repairs or inspections.
- Common Culprits: A rice cooker switch not working is frequently caused by a blown thermal fuse or debris blocking the magnetic sensor.
- Debris Buildup: Accumulated starch or food particles at the bottom of the inner housing often prevent the switch from staying in the “cook” position.
- Thermal Fuse: This component acts as a safety barrier and often fails after years of use; it is an inexpensive part to replace.
- Mechanical Wear: Over time, the spring-loaded lever can lose its tension, leading to switches that flip up prematurely.
- Professional Help: If you are uncomfortable with electrical repairs, consult a certified technician to avoid fire hazards.
Understanding the Mechanics of Your Rice Cooker
To fix the problem, you first need to understand how the machine actually “thinks.” Most standard electric rice cookers operate using a simple, clever mechanism. At the bottom of the heating element, there is a small, spring-loaded magnet. This magnet is designed to lose its magnetic strength once it reaches a specific temperature usually the boiling point of water, which is 212 degrees Fahrenheit (100 degrees Celsius).
When you have liquid (water) in the pot, the temperature stays at 212 degrees. Once the water is absorbed into the rice, the temperature of the pot begins to rise rapidly. The magnet detects this heat spike, loses its grip, and the spring releases the switch, clicking it into the “warm” mode. If your rice cooker switch not working, it usually means this magnetic sensor is either obstructed, worn out, or the thermal circuit has been broken.
The Role of the Thermal Fuse
Modern rice cookers have a built-in safety device called a thermal fuse. This is a one-time-use component that protects your home from fire. If the rice cooker overheats—perhaps because the temperature sensor failed the thermal fuse will blow, effectively cutting off all power to the unit. If your cooker seems completely dead, the fuse is often the primary suspect.
The Magnetic Sensor and Internal Spring
The lever you push down is physically connected to that heat-sensitive magnet. If you notice that the switch feels “loose” or simply will not stay depressed, it may be a mechanical failure of the spring. Furthermore, if you are a frequent cook, small grains of rice or hardened starch can wedge themselves into the sensor housing, physically preventing the magnet from making contact with the bottom of the pot.
Step 1: Troubleshooting Simple Issues
Before you get out the screwdriver, perform a few basic “clean and check” tasks. Many people find that their rice cooker switch not working issue is solved simply by removing hidden debris. When we cook, small bits of starch-heavy water can boil over or drip down into the heating chamber. Over time, this dries into a hard, crusty barrier.
Visual guide about Rice Cooker Switch Not Working
Image source: images.bigoven.com
Deep Cleaning the Heating Plate
Start by unplugging the unit and letting it cool completely. Inspect the center of the heating plate. Is there a buildup of brown, burnt residue? Use a damp (not wet) cloth with a little vinegar to gently scrub the heating plate and the sensor button in the middle. If the sensor button doesn’t move freely when you press it with your finger, it is stuck. Clean around the edges until it bounces back with a crisp, springy motion.
Checking the Inner Pot
Believe it or not, the pot itself is part of the mechanism. If your inner pot is dented at the bottom, it won’t make flush contact with the heating element and the sensor. A gap between the pot and the heater means the heat won’t transfer correctly. Place your pot on a flat surface like a countertop and ensure it isn’t wobbling. If it’s dented, the rice cooker switch not working because it can’t detect the temperature properly.
Step 2: Inspecting Internal Components
If cleaning didn’t solve the issue, it’s time to look under the hood. Please remember that you must have the unit unplugged. Never work on an appliance that is connected to a power outlet. You will likely need a Phillips-head screwdriver to remove the screws on the bottom of the rice cooker casing.
Opening the Casing Safely
Turn the unit upside down. Look for screws that might be hidden under rubber feet or stickers. Once removed, carefully lift the bottom plate. Inside, you will see a maze of wires, the thermal fuse, and the switch mechanism. Take a photo with your phone before moving anything so you remember where all the wires connect.
Identifying Signs of Damage
Look for blackened wires or charred plastic. If you see melted insulation, the device has experienced a short circuit. If everything looks clean, check the physical switch lever. Is the plastic hook that holds it in the “cook” position broken?
Sometimes, the plastic clip that keeps the switch depressed snaps off, making it impossible to cook rice. This is a common mechanical failure where the switch is perfectly fine, but the housing is damaged.
Step 3: Replacing the Thermal Fuse
If your cooker has power (the light turns on) but refuses to heat, or if it is completely dead despite being plugged in, the thermal fuse is the most likely culprit. The thermal fuse is usually covered by a heat-resistant fiberglass sleeve located along the wiring path near the heating element.
How to Test the Fuse
You can test a fuse using a multimeter. Set it to the continuity setting (the setting that beeps). Touch the probes to both ends of the thermal fuse. If the multimeter does not beep or show zero resistance, the fuse is blown and must be replaced. Fuses are very cheap and can be found at local hardware stores or online electronics shops.
Installing the New Fuse
Since the thermal fuse is heat-sensitive, you should not solder it directly. Soldering can generate enough heat to pop the new fuse immediately. Instead, use heat-resistant crimp connectors to attach the new fuse to the existing wires. Ensure the fiberglass sleeve covers the new fuse completely to prevent any accidental shorts.
Step 4: Preventing Future Switch Failures
Now that you have fixed your rice cooker, let’s talk about how to keep it working for years. Maintenance is the key to preventing the “rice cooker switch not working” problem from returning. 2026 standards for home maintenance emphasize longevity, so treating your appliance well is a great habit.
Avoid Boiling Over
The most common cause of switch failure is liquid entering the internal components. Always measure your rice and water ratios correctly. If you use too much water, the pot will boil over, sending starch-filled water down into the electrical chamber. This creates the sticky residue that gums up your sensor and damages wires.
Dry the Outside of the Inner Pot
Before placing the inner pot into the heating base, always dry the exterior with a towel. If you put a wet pot into the cooker, that water will eventually evaporate into the machine, potentially causing corrosion on the internal electrical contacts. It takes two seconds to dry the bottom of the pot, but it saves hours of repair work later.
When to Let Go?
While DIY repair is empowering, there is a limit. If you have replaced the fuse and cleaned the sensor, but the cooker still fails to operate, there might be damage to the main printed circuit board (PCB) or the heating element itself. If the heating element has burned out, it is usually not worth the cost of replacement.
In cases where the repair requires soldering or involves complex internal wiring that you aren’t familiar with, please prioritize your safety. A malfunctioning electrical appliance can pose a significant fire hazard. If you are unsure, take your unit to a professional repair shop. Many local repair cafes are popping up in 2026, offering community-based help for fixing electronics for free or at a very low cost.
Conclusion
A rice cooker switch not working doesn’t have to be the end of your favorite kitchen companion. Most of the time, the fix is hidden right under your nose, waiting for a little cleaning or a simple fuse swap.
By taking the time to understand your appliance, you extend its life, save money, and contribute to a more sustainable lifestyle. Keep your heating plate clean, avoid over-filling, and you will be enjoying perfectly cooked rice for years to come.
FAQs
Why does my rice cooker switch keep popping up?
This usually happens because the magnetic sensor is blocked by food debris or the inner pot is not making proper contact with the heating plate. Clean the center button and ensure your pot is perfectly clean and dry before starting a new cycle.
Is it dangerous to keep using a rice cooker with a temperamental switch?
Yes, it can be a fire hazard. If the switch isn’t operating correctly, the unit may not be regulating temperature properly, which could lead to overheating or short-circuiting.
Where can I find replacement parts for my rice cooker?
Check the manufacturer’s website first, or search for the model number on electronic parts supply stores. Many universal thermal fuses are compatible across different brands if you match the temperature rating.
What if my rice cooker is still under warranty?
If your device is still covered under warranty, do not open the casing yourself! Opening the unit will likely void your warranty. Contact the manufacturer’s customer service department immediately to get a free repair or replacement.
Why does the rice cooker smell like burning plastic?
This is often a sign of electrical failure, such as melted wire insulation or a faulty thermal fuse. Unplug the unit immediately and do not use it again until it has been inspected by a professional.
Can I use a multimeter to fix any rice cooker issue?
A multimeter is excellent for diagnosing electrical continuity in fuses and power cords, but it cannot fix mechanical failures like broken springs or plastic housing clips. Use it as a diagnostic tool, not as a magic cure-all.