
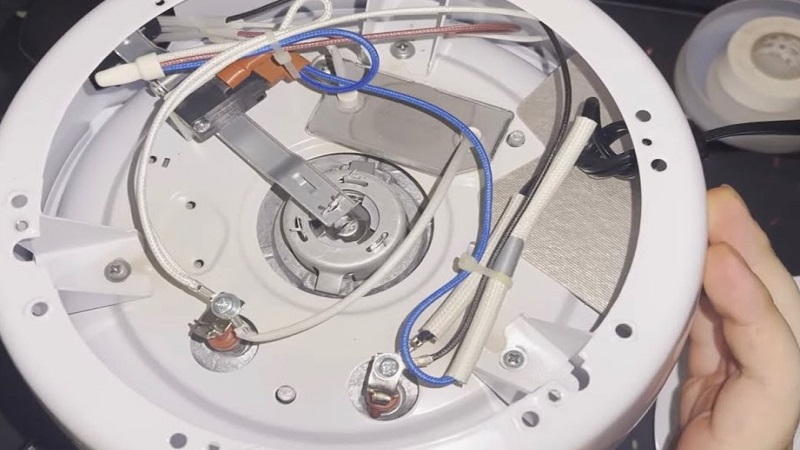
If your rice cooker spring not working, your appliance cannot properly sense when the rice is done, often leading to burnt or undercooked meals. This common issue is usually caused by food debris, a weakened spring, or a misaligned thermal sensor. With a few basic tools and our step-by-step guide, you can restore your cooker to perfect condition.
We have all been there. You are hungry, you have prepped your ingredients, and you push that little lever down on your trusty rice cooker. You expect that satisfying click and the familiar hum of the steam. Instead, the lever pops back up immediately, or perhaps it stays down, but the rice ends up burnt to a crisp.
If you have been searching for help because your rice cooker spring not working, you are definitely not alone. It is one of the most frustrating kitchen mishaps, but it is often easier to fix than you might think.
By 2026, rice cookers have become incredibly advanced, yet the fundamental mechanism the thermal sensor spring remains the heart of the machine. Whether you are using a high-end induction cooker or a classic budget-friendly model, the problem often comes down to simple physics and hygiene. In this guide, we will walk you through how to diagnose the issue, safely clean your device, and get back to making perfect, fluffy rice without the stress.
Key Takeaways
- Identify the Cause: Most issues stem from trapped debris or a stuck central sensor button rather than a broken internal mechanism.
- Safety First: Always unplug your rice cooker and let it cool completely before attempting any repairs or cleaning.
- Regular Maintenance: Cleaning the heating plate and the spring sensor after every use prevents food buildup that causes the spring to jam.
- Simple Repairs: Often, a gentle cleaning or careful repositioning of the thermal spring is all you need to fix a rice cooker spring not working.
- When to Replace: If the spring has lost its tension or the thermal sensor wiring is damaged, it may be time for a professional repair or a new appliance.
Understanding How the Sensor Spring Works
To understand why your rice cooker spring not working, you first need to understand its role. At the center of your heating plate, there is a metallic, spring-loaded button. This is the thermal sensor. Its job is simple: it measures the temperature of the inner pot.
When the water in the pot boils, the temperature stays at 100 degrees Celsius. Once the water is absorbed, the temperature begins to rise above that point. The spring-loaded sensor detects this change and triggers the “keep warm” cycle.
The Role of Tension and Heat
The spring provides the necessary tension to hold the lever down while the cooker is active. If the spring loses its “bounce” or if the sensor becomes caked with dried starch, the machine gets confused.
It might think the rice is done when it is raw, or it might not know when to stop heating, leading to that dreaded burnt crust at the bottom of your pot. When you notice the rice cooker spring not working, it is usually because the sensor is physically blocked or the spring has simply grown tired over years of use.
Why Debris is the Number One Enemy
In a busy kitchen, it is easy to spill a bit of rice water or starch onto the heating plate. Over time, this liquid evaporates, leaving behind a sticky, crusty residue. This residue acts like glue, trapping the sensor button in a fixed position. If the button cannot move freely, the spring cannot do its job. Cleaning this area is the first step in any troubleshooting process.
Step-by-Step Troubleshooting for Beginners
Before you toss your appliance in the bin, try these simple steps. Most of the time, the fix takes less than five minutes. Remember, always start with a cold, unplugged appliance. We want to be safe while we work.
Visual guide about Rice Cooker Spring Not Working
Image source: i.ytimg.com
Cleaning the Thermal Sensor
Grab a soft, damp cloth or a paper towel. Gently wipe the center of the heating plate. If there is hardened gunk, use a cotton swab dipped in a tiny amount of vinegar to soften the debris. Be careful not to let liquid drip into the interior of the machine.
Once the area is clean, press the sensor button down with your finger a few times. It should feel springy and responsive. If it pops back up smoothly, you have likely solved the problem!
Checking for Mechanical Obstruction
Sometimes, a stray grain of rice or a bit of dried quinoa can fall under the edge of the heating plate and block the spring mechanism. Take a look at the gap between the center sensor and the heating plate. If you see debris, use a pair of tweezers to carefully remove it. You do not need to take the whole machine apart—most of these issues happen right at the surface level.
Advanced Fixes When Cleaning Isn’t Enough
If you have cleaned the surface and the rice cooker spring not working persists, the issue might be deeper. This is where we look at the internal components. Please note: if your machine is under warranty, opening the case will void it. If you are out of warranty, you can proceed with caution.
Realigning the Thermal Sensor
If the sensor button feels crooked or tilted, it might be stuck on the rim of the opening. Use a thin screwdriver to gently nudge it into the center. Sometimes, the spring underneath has shifted slightly due to vibrations over time. A small, gentle adjustment is often enough to put it back into place.
Dealing with a Weakened Spring
If the button moves freely but the lever still won’t stay down, the spring may have lost its tension. In some models, the spring is accessible by removing the bottom plate of the rice cooker. Once inside, you can see if the spring has become unhooked or if it has simply collapsed from years of heating cycles.
If you are handy with tools, you can replace the spring with a similar tension spring from a hardware store. However, if this feels too technical, do not hesitate to reach out to a professional repair service.
Maintenance Tips to Prevent Future Problems
The best way to handle a rice cooker spring not working is to stop the issue before it starts. Prevention is much easier than repair. Think of your rice cooker as a delicate piece of technology—because it is!
The Dry Pot Rule
Always, and I mean always, wipe the exterior of your inner pot dry before placing it into the rice cooker. Any water on the outside of the pot will drip down onto the heating plate and the sensor spring. This water contains starch from the rice, which creates that sticky residue we talked about earlier. Keeping the outside dry keeps your machine running perfectly.
Routine Inspections
Make it a habit to check the sensor button after every couple of uses. Just a quick press to make sure it is snappy and moving well. If it feels sluggish, clean it immediately. Starch builds up slowly, so a quick wipe-down every week is a great way to ensure your appliance lasts for years to come.
When to Replace Your Rice Cooker
Sometimes, even with the best care, components fail. If you have cleaned the sensor, checked the spring, and the device still refuses to cook properly, it might be time to move on. If the electronic control board is faulty, or if the wiring leading to the thermal sensor is frayed or burned, it is safer to replace the unit than to attempt a risky electrical repair.
Considering the Age of the Appliance
If your cooker is more than five or seven years old, the cost of parts and your time might outweigh the price of a new, more efficient model. Modern cookers in 2026 feature better non-stick coatings and more durable sensors. If you find yourself constantly troubleshooting, it might be time for an upgrade that brings more reliability to your kitchen.
Conclusion: Keep Cooking with Confidence
Dealing with a rice cooker spring not working can be a headache, but it is rarely the end of the road for your machine. By keeping the thermal sensor clean and ensuring no debris interferes with the spring mechanism, you can avoid most common failures. Whether you are a meal-prep pro or just making a quick bowl of rice for dinner, a little bit of maintenance goes a long way.
Remember, your kitchen appliances are there to make your life easier, not more complicated. Take care of your rice cooker, and it will take care of your appetite. Happy cooking, and may your rice always come out perfectly fluffy and delicious!
Frequently Asked Questions
Why does my rice cooker lever keep popping up immediately?
This usually happens because the thermal sensor is dirty or the inner pot is not making proper contact with the center spring. Clean the sensor button and the bottom of your pot, then ensure the pot is seated flat on the heating plate.
Can I use soap to clean the rice cooker sensor?
You should avoid using large amounts of water or soap directly on the heating plate. Use a damp cloth or a cotton swab with a little vinegar to wipe away residue, then dry it completely with a paper towel.
Is it safe to try and stretch the spring?
Stretching the spring manually is generally not recommended as it can lead to inconsistent heat sensing and potential safety issues. If the spring is permanently deformed, it is better to replace the part or contact the manufacturer.
How often should I clean the thermal sensor?
You should inspect and wipe down the sensor area every time you notice starch buildup or at least once a month. Keeping this area clean is the best way to prevent the rice cooker spring not working.
What if my rice is burning at the bottom?
Burnt rice often means the thermal sensor is not detecting the temperature rise correctly, possibly due to debris preventing the spring from retracting. Thoroughly clean the sensor button and the surface of the heating plate.
When should I stop trying to fix it myself?
If you see signs of damaged wires, burnt plastic smells, or if the internal electrical components are clearly corroded, stop immediately. These issues are best handled by a professional technician to prevent fire hazards.